
[post_title]
In many race series, getting the most out of your tyres is essential for staying in the lead when it comes to pit stops. By and large F1 drivers are excellent at tyre saving. Many years of practice and staring at the laptime delta on their dash gives them an intrinsic feel for where leaning extra hard on the tyres causes excessive damage which will cost them dearly in a long run. Put simply, they wouldn’t have made it to the top step of their career without being experts at tyre exploitation. However, this doesn’t mean that they wouldn’t benefit from some extra help from the world’s fastest driver: Dynamic Lap.
In the same way as we can tell Dynamic Lap to set the quickest possible laptime subject to a constraint on electrical energy, fuel or temperature, we can also limit tyre wear energy. If we sweep through a range of rear tyre energy from 1.9MJ (flat out) to 1.5MJ we see the laptime deteriorate from 1m19.61 to 1m20.90 (see video on how to perform this). Along with some good knowledge of how quickly the tyres degrade at each energy level from testing, this enables race engineers and strategist to decide on the optimal stint, how many pit stops to make and where to push.

F1 teams go to significant lengths to find the most efficient tyre saving. The drivers practice different techniques in the simulator to achieve the quickest possible laptime while protecting the tyres, and engineers do extensive post-session analysis to identify the most efficient techniques from the data. From telemetry data it can be difficult to draw conclusions due to noise in the data, and even the slightest mistake from the driver can make it impossible to draw conclusions at the level of certainty required. After all we’re talking about driving slower for a long term gain, so we had better be sure about our conclusions. This whole process can be simplified by running a tyre energy sweep in Dynamic Lap. We can resolve differences with millisecond accuracy:

Figure 2 shows an overlay and racing line with rear left tyre wear power plotted as a height above the track. We can look through some of the features to identify the perfect tyre energy strategy:
- Release the throttle gently at end of straight to slow the car before braking.
- This allows a reduction in peak brake pressure to avoid tyre-damaging slip.
- Gradually lift off in high speed corners where tyre wear power can be very high.
- Lifting off in high speed makes it possible to hold a tighter racing line to claw back some of the laptime lost.
- Slightly more gentle throttle application to avoid the rears spinning up on exit [but not too gentle or you could lose a lot of time here!].
Maybe you’ve got a superb driver who’s already too good to require this advice, but no matter how great they are, they can’t improve upon this theoretically perfect laptime. This is where simulation can really help; we can re-optimise the car setup for tyre saving to make it quicker than would be possible through super-human driving alone.
By exploring three setup parameters, we can make the car more ideally suited to driving quickly and protecting the tyres. We ran over 10,000 laptime simulations, each driven with precision tyre saving to find the optimal setup for each tyre energy target. These setup tweaks unlock laptime potential that would otherwise be inaccessible without these changes. The setup parameters changed were:
- Through stop brake balance (front brake pressure/total brake pressure and how it varies during braking). Dynamic Lap can automatically adjust brake balance through the stop to make the best use of the available grip. In the Figure 3, each brake balance curve represents a different rear tyre saving level. If we follow a single curve from high to low brake pressure, we see the brake balance moves rearward through the stop. At start of stop the brake pressure is typically high and the brake balance is forwards to prevent rear locking which could cause instability. Towards the end of braking, the driver wants the car to turn in, so the brake balance moves rearwards to prevent understeer and front locking. If we increase the level of tyre saving the brake balance moves forwards to protect the rear tyres from under rotation. The difference is greater at start of stop (+23%) compared to end of stop (+18%) as rear tyre slip is more damaging initially when the car is going quicker and the downforce is high, while for laptime it’s important to get the car turned in at the end of stop. In F1 the brake balance map can adjusted on a steering wheel switch, so the driver could change this through the race.

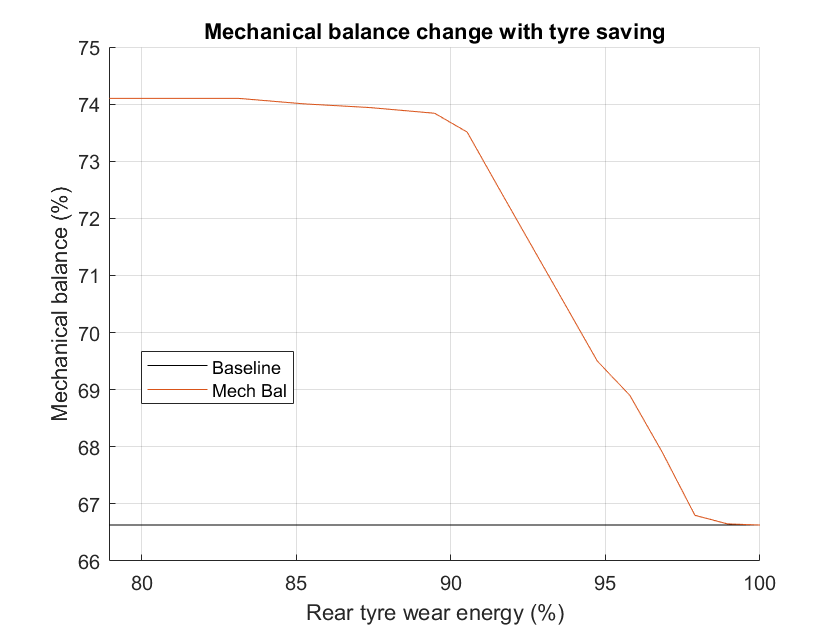
- Mechanical balance (front roll stiffness/total roll stiffness). By adjusting the anti-roll bars we can soften the rear of the car in roll while stiffening the front and maintaining total roll stiffness. The front outside tyre is then responsible for reacting more of the car’s rolling moment through the corner while the vertical tyre loads are move evenly balanced at the rear. Since the tyres lose friction under higher vertical loads, this increases the rear grip at the expense of front grip. The rear tyres can then work less hard to generate lateral force which may help race performance if we’re limited by rear tyre wear. In Figure 4 we see the optimal mechanical balance move forwards from 66.6% to 74.1% as we reduce rear tyre wear energy. There is a limit to how far we can go with mechanical balance both practically due to front wheel locking and 3-wheeling in corner; and physically as a solid front plus disconnected rear anti-roll bar will not achieve 100% mech bal due to tyre squash and suspension compliance.
- Aero balance (front downforce/total downforce) can be moved rearwards by raising rear downforce through wing angle, and reducing front downforce with a flap angle adjustment. This allows us to increase the rear grip at the expenses of front grip, and the rear tyre slip reduces. Again, we’re swapping grip at one end for the other, this can be beneficial by evening out the tyre wear between the two axles. The car will start the race with more understeer, but if the rear tyres wear out first, then the balance will become more neutral as the race progresses. Figure 5 shows the quickest aero balance level for each level of aerobalance.

The exciting part about these balance changes is the effect that this has on laptime. From Figure 6 we see that if we need to reduce rear tyre wear energy to 90% then a brake balance adjust or mechanical balance change can improve our laptime potential by 0.06sec; while an aero balance shift could gain 0.09sec per lap. If we run an optimisation and allow all three balance adjustments to be changed simultaneously (but to a lesser degree), we increase this to 0.13 seconds per lap. In racing terms this is significant advantage.

Depending on the racing series, it might be possible to make some or all of these balance changes between qualifying and the race, which enables the car to be setup for car for ultimate pace, then adjusted for long run performance. In F1, the brake balance can be adjusted by the driver, and the front wing angle can be changed in the pit stops to perfect the aero balance.
The balance changes we see here are quite extreme by usual standards, and it remains to be seen whether an actual race driver would be happy to drive with this balance or whether a more modest adjustment is better. This would be an excellent test to prove out with drivers using our Canopy compiled simulator model! If you would like to speak to us about tyre optimisation, or learn more about our tyre thermal model, then please get in touch at hello@canopysimulations.com.